Forging a Minecraft Mod
By HyperElectron

Structure Generation
Hello! I've been asked to make a tutorial on structure generation. Now you may be thinking, structure gen? Surely that must be very tedious having to write "world.setBlock(x, y, z, block)" a million times and keep fixing the x, y and z coordinates to make it actually look like a structue. I've got some good news. Here I'll teach you how to generate structures you've made in game. So lets begin! First off, you need two pieces of software: MCEdit and Mithions .schematic to java converter. If you dont have a 64bit operating system, you can download MCEdit here. Now we can build our structure in game. Open minecraft and on a new super flat world, build your building (doesnt have to be superflat, but its alot easier).

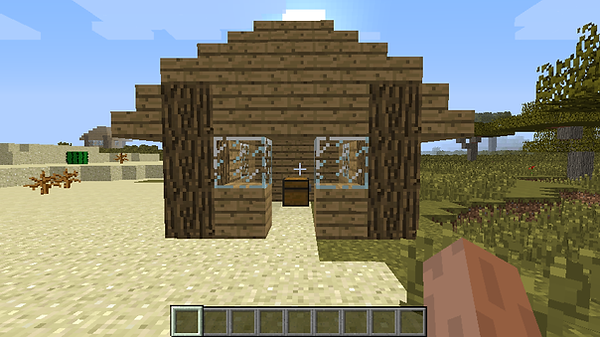
Here is the small house I want to spawn. Cool, now that i've built it and saved outside it, we need to open MCEdit. When you first open it, it needs to be extracted to a location. I have a folder called MCEdit. Once thats done extracting, go to that location and open the folder it put in there and find "mcedit" the application. Run it. Once it opens, click the "open" button. It should have opened a file chooser that is the location of the "saves" folder in your ".minecraft". Find the save you are looking for, open it and click on the "level.dat" file and click "open". Now it should load up and you'll be standing outside your building, just as if you were in minecraft! If you're no familar with MCEdit i'll explain the basic controls. Your in no-clip so where you look and move foward using the "W" key is where you'll go. To look around, hold the right mouse click. Now you should see a white "block" whereever your cursor is. If you press right click, you'll start to highlight alot more blocks, do this and highlight every block of your building, Use scaffolding if you need to. To place blocks, press "2". On the dialog on the left, change mode to "fill" if it isnt already. You can change the blocks to by clicking on the "stone" block. You can change the height, length and width of how many blocks you'll place. Change them to 1 for now to build a pillar if you need to. It should look like this:

Click the "export" button on the left. It will ask you to save it somewhere. Save it and remember where it is, you'll need it for the next part. Now we need to open the .schematic to java conventer. Find the place where you extracted it to and open the "SchematicConverter" executable jar file. It will bring up and small window. Click the full screen button. Now you have alot more buttons and fields, I'll explain them as I go along. First click the "add file" button under the field. Find the .schematic file we exported from MCEdit that we did earlier. Now the empty text field should say have the location of the file with the name in square brackets at the end. Click on it. Now you should see the black sqaure on the left has the pattern of the first layer of the building we exported. Underneath the add file button you can choose the loaction on where to output the class file once we've done. I've left it to the output folder by default. Now underneath that should be a ticked box for "ignore air". Untick that box. Basically what this can do for us is if it needs to be generated underground, there will be air blocks where the air blocks are in the structure so other blocks like stone dont fill it up, for example the dungeon wouldnt ingore air. Leave smart spawning enabled, this will allow us to choose what blocks our structure can spawn on. Move the spawn height tolerance to "1" if you want it to just be on the ground. Any higher and it will spawn in the air. Now for the spawn blocks. Right now, the "Structure can spawn on" blocks is empty. To add a block from the "known blocks" list, click on it and click the arrow button that points to the "structure can spawn on" list. To remove one from the structure spawn on list, click on it and click the arrow pointing towards the known blocks list. Now that we've done that and added all the blocks we want it to spawn on click the "generate" button on the very top right.

Now go to the output location and you should see a ".java" file with the name of your schematic. Awesome! All we need to do now is move that file into eclipse. Go to your forge workspace location and navigate to: src --> main --> java --> packages. Now move it into a folder, the one Im moving it in is the "gen" folder which is "forgingmc.minecraftthing.gen" package. Now when we open eclipse it should be there but full of errors. Pretty much all the errors are import errors, so just right click it and click "import". Change the package declaration to yours. Now if like me, you have stairs, just replace all the "Blocks.stairCompactPlanks" to "Blocks.woodtype_stairs". Example: "Blocks.oak_stairs" for oak stairs. If you have "world.setBlockAndMetadataWithNotify" change it to "world.setBlockMetadataWithNotify". Make sure to remove the scaffolding if you had some from the code! Now all you have to do is open a generator class. The Easiest option would be to open the ore generation class if you have one. If not, you can go to my ore gen class tutorial and do that. Under the method "generateOverWorld" add this:
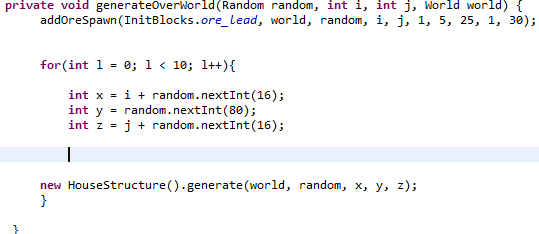
Obviously if you dont have ore the "addOreSpawn" method isnt needed. Now I shall explain the code. The for loop loops how rare the structure is. Changing the expression of "l < somenumber" will determine how rare it is. Right now its 10, and that means it is pretty common. The next 3 intergers are just the x, y and z. Leave them except for the y. If you change the interger parameter for the "nextInt" method, it determines how high it can spawn, starting from the bottom layer. The next part is very straight fowards. The house structure class is just the class we fixed and got from the schematic converter. The generate method we need to use because that will obviously build our structure. Now that we've done that, test it! Play around with the numbers to make it the way you want. Awesome! Now we can make structures spawn in the overworld.